Signing in with Google
You can use a Google account to sign in to TIBCO Cloud if your organization uses Google as the authentication provider.
To enable Google as the IdP for your email domain, you must first send an authorization request to TIBCO to enable Google as the IdP for your email domain because the decision applies to all users of your email domain. After your authorization request is approved, you are notified via email. You can then enable Sign in with Google. The changes are implemented immediately.
You can also disable signing in with Google and switch back to signing in with your TIBCO Account credentials.
Note that this setup is necessary so that Google can be used as the IdP by all the users of your organization and they are no longer prompted to sign in to TIBCO Cloud by using TIBCO IdP.
Prerequisite
As an organization owner, you must be able to sign in to TIBCO Cloud successfully by clicking Sign in with Google.
Requesting Permission to Sign In with Google
To request permission to enable Corporate Account:
- Procedure
-
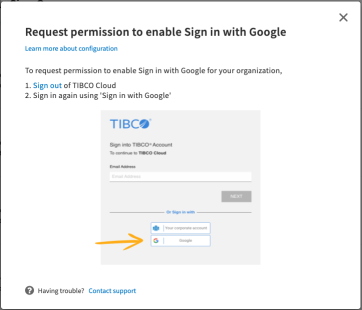
Sign in to TIBCO Cloud by clicking Sign in with Google on the sign-in page.
-
On the Settings tab, in the Enterprise SSO section, click Request Google next to Google.
You are asked to sign out and sign in again by using the Sign in with Google option.
-
Sign in again with Google (step 1) and click Request Google (step 2).
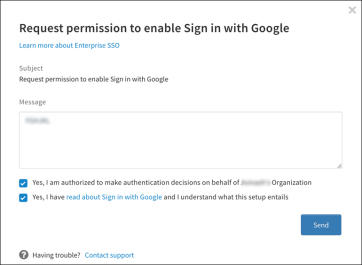
The Request permission to enable Sign in with Google dialog is displayed. Enter all the necessary information and click Send.
You can cancel your request before it is approved. In the Enterprise SSO section next to Google, click the Update button.
An email notification is sent to you after the request is approved. You can check the status of your request in the Enterprise SSO section on the Settings tab.
-
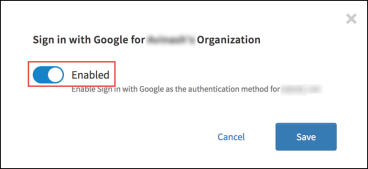
After your request has been approved, in the Google section, click the Update configuration link.
-
In the Sign in with Google for <your organization name> Organization window, enable signing in with Google for your organization and click Save.
Signing in with Google
To sign in with Google:
- Procedure
-
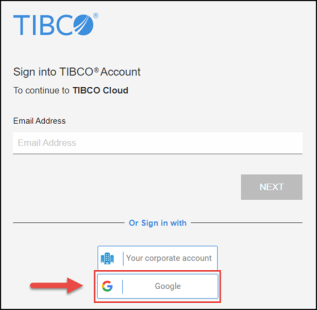
On the Sign in to TIBCO Cloud page, click Sign in with Google.
-
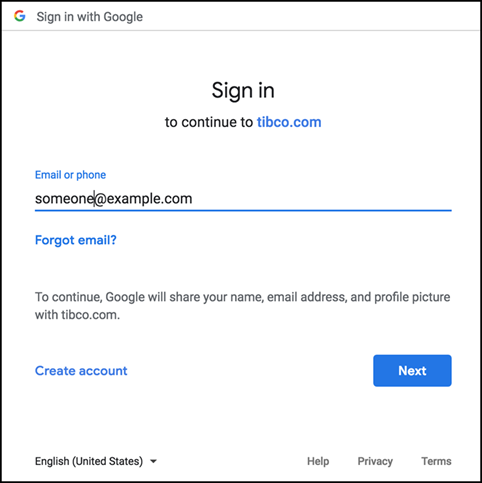
Enter the required information and click Next.
Depending on which page the users sign in to, they are either directed to the TIBCO Cloud landing page or the landing page of the domain capability.
Disabling Sign in with Google
You can disable Google sign in at any time after enabling it. It is a self-service feature.
- Procedure
-
Go to the Settings tab, in the Enterprise SSO section, click Update next to Google.
-
To disable signing in with Google, in the Cancel request to enable Sign in with Google dialog, click Send.
Signing in with Google is disabled for all the users in your organization. For more information, see the Points to be Noted section on the TIBCO Cloud Federated Authentication page.